3 easy steps to recruit online with ChallengeRocket!


If you’re reading this, I’m guessing you’re probably intending to take advantage of ChallengeRocket to give a major boost to your recruitment in IT. Perhaps you’ve already signed up and started your free trial - but wherever you are in the process, this article will accompany you along the way. Many thanks for trusting us! So, before setting up your first Job Offer, make use of this brief tutorial so you can make the most of our platform.
Step 1: Running your first Job Offer linked with a SkillChallenge
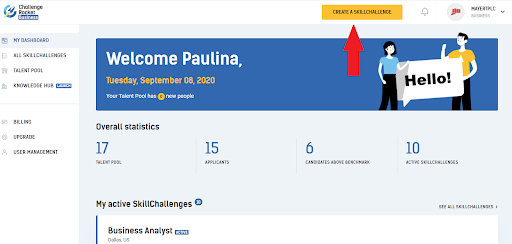
Source: ChallengeRocket.com
First off, having logged in at Challengerocket.com/business, go to the MY DASHBOARD tab in the main menu. Using the dashboard, you’ll be able to publish a Job Offer with an interactive SkillChallenge. By clicking the CREATE A SKILLCHALLENGE button, you will be directed to the Job Offer editor. After selecting the job position you are hiring for, go ahead and build a job description. Thankfully, some fields are already filled out with ready-to-use templates (you can use those or edit them yourself) and some have been left blank to be filled in by you. All that should take 5 minutes or so.
PRO TIP: Our experience shows that you can grab the attention of many more candidates with an attractive job description. The ideal description should cover the following: info about the recruitment process (so it’s really transparent) and a brief description that paints a vivid picture of the project (and the team) that the candidate will be hoping to join.
Step 2: Connecting the SkillChallenge test to the Job Offer
The next step is to connect up the Job Offer with your particular SkillChallenge - the interactive skills test that enables you to pre-assess candidates’ competences and motivations. To do so, you simply generate a test with a selected number of questions (e.g. 2 coding and 2 theoretical questions). If you want to connect a Job Offer with a test you’ve created yourself - let us know with the CONTACT US button and we’ll make that happen for you.Remember that it’s you who sets a benchmark for the test - the minimum passing mark - for the candidates. Having taken the test, all the applicants will receive automated, personalized feedback - based on the score they achieve.
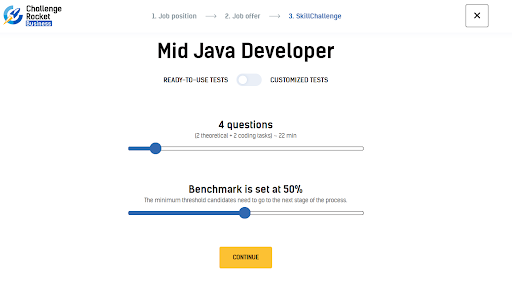
Source: ChallengeRocket.com
PRO TIP: we’ve noticed that candidates find tests that are no longer than 20-30 minutes long easiest to engage with. In practice, this means that the test should consist of just 1 coding task, or up to 20 theoretical questions.
OK, now that you have created the Job Offer and SkillChallenge, all you have to do is start the project with the RUN SKILLCHALLENGE button. That's it - you’re done! If you’d like to preview the Job Offer and the test, you can find buttons on the side menu to check those out.
Step 3: Browsing the candidates who applied for your Job Offer
OK, so your Job Offer is active - let’s see what happens next! You log into ChallengeRocket.com and see a notification: “Your Talent Pool has 10 new people” - great! Now, how to best check out these new candidates? There are 2 ways: take a look below to find out about both!
How to browse the talent pool with applicants for all your Job Offers
After logging in, go to the TALENT POOL tab in the side menu (see picture below) to be directed to the page with all the applicants for all of your Job Offers. The candidates are listed chronologically by default, which means you can see the newest applicants at the top of the list. If you wish, you can filter them by location, technologies and skills.
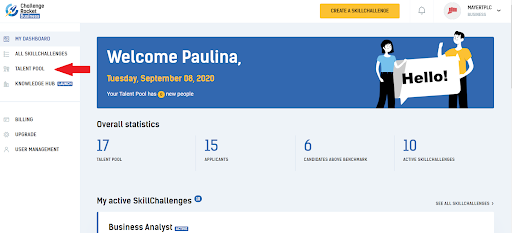
Source: ChallengeRocket.com
How to browse the talent pool for a specific Job Offer
To check candidates who applied for a particular Job Offer, go to the ALL SKILLCHALLENGES tab in the side menu (see the steps in the pictures below). You will be directed to a subpage with all your Job Offers. Select one of them and you’ll see an overview of the Job Offer with all the statistics - visitors, applicants, and candidates who achieved the benchmark for the test. This final number indicates the number of recommended people who can move to the next stage of the recruitment process. Candidates are recommended based on their test performance and the criteria matching your requirements.
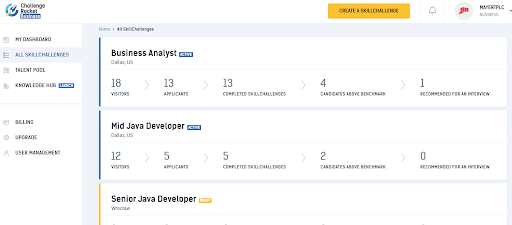
Source: ChallengeRocket.com
Source: ChallengeRocket.com
PRO TIP: In the overview of statistics, you can see what the average test score of the candidates is. It tells you the average level of the candidates’ performance and also lets you know whether the test you chose was perhaps too complex and/or time-consuming.
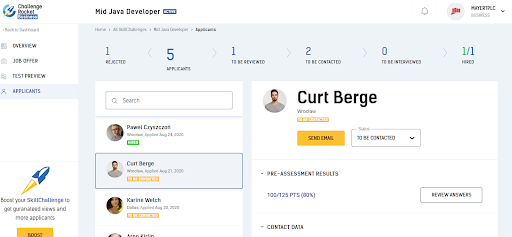
Below the section with statistics, you can see the newest applicants for a particular Job Offer with a summary of their test scores and criteria for hiring. On choosing one of them, you will be directed to the APPLICANTS page (that’s also in the side menu) where applicants are listed chronologically.
Candidate profile
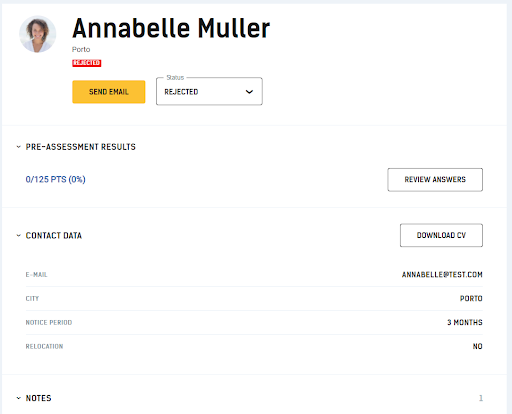
You have published the Job Offer, and candidates have been already applying - now, it is time to contact them - what’s the best way to go about this? First, select a candidate from the list in the APPLICANTS section in the specific SkillChallenge view. The candidate’s profile will appear on the right-hand side of the dashboard. The profile presents the following data: the candidate’s score on the pre-assessment test, the option to review the answers, contact data, his/her CV, as well as additional information such as: notice period, expected salary and willingness to relocate.
You can also use the NOTES section to add your own insights and check the candidate’s activity. At the top of the candidate profile, you can find the STATUS field - this is something you can modify as you process candidates and move them on to different stages of the recruitment process.
Source: ChallengeRocket.com
Each new candidate automatically receives a TO BE REVIEWED status. The next step is down to you! When you review the candidate, you can:
- reject him or her by choosing the REJECTED status
- plan to contact the candidate with the TO BE CONTACTED status
- mark the candidate as being ready to be interviewed with the TO BE INTERVIEWED status
- let us know that you’ve hired a new employee and change the status to HIRED - congratulations!
In the next article, we will guide you through the process of building your company’s profile - known as your Candidate Hub. This is going to boost your employer branding so you gain much more visibility, and thus - a greater number of candidates!
I do hope that helped - stay tuned for more from ChallengeRocket!